Solar Panel Cleaning & Maintenance Kits
 Solar Mounting Structures
 Solar Batteries & Inverter Systems
 Commercial, Residential & Industrial Solar Panels
 Portable & Foldable Solar Panels
 IP Cameras
 HD Analog Camera
 Dash Cameras
 DVR (Digital Video Recorders)
 Integrated Alarm Systems
 AI-Powered Video Analytics
 Cloud Storage Solutions
 Camera Accessories
 NVR (Network Video Recorders)
 Special Cameras
 Video Management Software (VMS)
 Monitoring & Display Equipment
 Ethernet Cables
 Ethernet & PoE Switches
 Network Racks & Accessories
 Network Monitoring Software
 Modem & Routers
 WiFi Routers
 WiFi Controllers & Management Systems
 WiFi Antennas & Signal Boosters
 WiFi Adapters & Dongles
 IoT & Smart WiFi Devices
 WiFi Access Points (APs)
 Fiber Optic Accessories
 Optical Fiber Cables
 Smart Home Appliances
 Smart Home Entertainment
 Smart Hubs & Controllers
 Smart Lighting
 Smart Plugs & Power Management
 Smart Security & Surveillance
 Smart Sensors & Detectors
 Fleet Management & Commercial GPS Solutions
 HDDs & SSDs
 Cloud Storage Services
 Storage Area Network (SAN)
 Removable & Portable Storage
 Network-Attached Storage (NAS)
 Intercom & Video Door Entry Systems
 Electronic & Smart Locks
 Authentication Devices
 Access Control Systems
 Access Control Software & Integration
 Visitor & Time Attendance Management
 Access Control Panels & Controllers
 Electrical Tools & Testing Equipment
 Lighting Solutions
 Industrial Electrical Components
 Power Distribution Products
 Power Supply & Backup Solutions
 Wiring & Cables
 Electrical Conduits & Cable Management
 Cables
 Adaptors
 Extenders
 Computer Accessories
How to Install a Hikvision CCTV System: Step-by-Step Guide for Beginners
Installing a CCTV system can feel intimidating, especially if you're doing it for the first time. Fortunately, Hikvision has made it easier than ever to secure your home or business. Whether you're aiming for enhanced security, remote monitoring, or evidence collection, this guide will walk you through everything you need to know to install a Hikvision CCTV system effectively.
Why Choose Hikvision CCTV?
Hikvision is one of the world’s leading providers of video surveillance products and solutions. Known for their reliability, durability, and intelligent features, Hikvision CCTV systems are widely used in homes, offices, retail stores, public facilities, and large-scale infrastructure projects.
Key benefits include:
- High-definition video quality
- Remote access via mobile or PC
- Motion detection and smart alerts
- Compatibility with various smart systems
Now, let's break down how to install a Hikvision CCTV system from start to finish.
Step 1: Plan Your System
Before you begin, you need to map out your surveillance coverage.
Determine Your Surveillance Needs:
- How many cameras do you need?
- What areas need to be covered? (entrance, garage, backyard, hallway, etc.)
- Do you need indoor, outdoor, or both types of cameras?
- Will you be using PoE (Power over Ethernet) or analog HD cameras?
Create a simple floor plan or sketch and mark the ideal camera positions for maximum coverage.
Choose Your Equipment:
To install a Hikvision CCTV system, you’ll typically need:
- Hikvision Cameras (IP or HD analog)
- NVR (Network Video Recorder) or DVR (Digital Video Recorder)
- Hard Drive (for storage inside the NVR/DVR)
- Monitor (for live view)
- Ethernet cables (Cat5e/Cat6 for IP cameras)
- Coaxial cables with BNC connectors (for analog)
- PoE switch or power supply unit
- Screws, drill, and mounting brackets
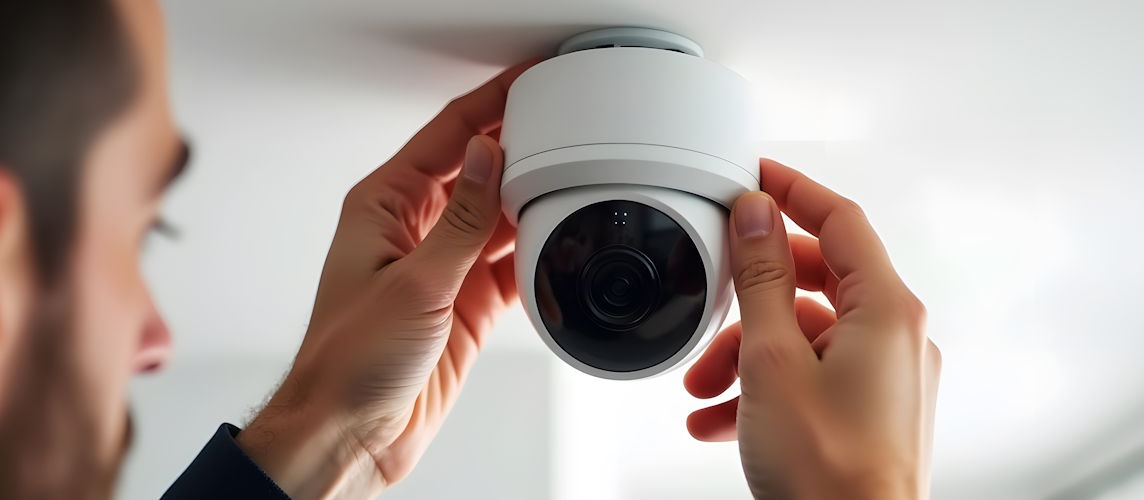
Step 2: Install the Cameras
Mounting Your Cameras:
- Use a pencil to mark where the screws will go.
- Drill holes and insert wall plugs.
- Attach the camera using screws and mounting brackets.
- Position the camera angle and tighten it in place.
Tips:
- Mount cameras at a height of at least 8 feet to avoid tampering.
- Avoid direct sunlight and reflective surfaces.
- For outdoor cameras, ensure they are weatherproof (IP66 or higher).
Step 3: Run the Cables
This step depends on the type of camera system you’ve chosen.
For IP Cameras:
- Use Cat5e or Cat6 cables.
- Connect one end to the camera and the other to a PoE switch or directly to the NVR if it supports PoE.
For Analog Cameras:
- Use RG59 coaxial cable with BNC connectors.
- One end connects to the camera and the other to the DVR.
- A separate power cable may be needed unless you use a combined Siamese cable.
Cable Management Tips:
- Use cable clips or conduits for a neat installation.
- Avoid running cables near high-power electrical lines.
- If you’re drilling through walls, use grommets to protect the cable.
Step 4: Connect to the NVR or DVR
NVR Setup (IP System):
- Connect all cameras to the PoE ports on the NVR or PoE switch.
- Connect the NVR to a monitor using HDMI or VGA cable.
- Attach a USB mouse for easy navigation.
- Insert and initialize the hard drive if it hasn’t been pre-installed.
DVR Setup (Analog System):
- Connect cameras to the DVR using coaxial cables.
- Connect the DVR to the monitor.
- Power up the DVR and cameras.
Step 5: Initial Configuration
Once everything is connected and powered up, you can configure your system.
Activation and Setup:
- Turn on the system.
- The first screen will prompt you to activate the NVR/DVR by setting a strong password.
- Set up security questions and export a GUID file (for password recovery).
Time and Network Settings:
- Set the correct date and time.
- Configure the network settings (DHCP or Static IP).
- Enable Hik-Connect for remote access.
Add Cameras (If not auto-detected):
- Go to Camera Management > Add Camera.
- Input camera IP addresses or search using the "Online Devices" tab.
- Ensure each camera is activated and connected.
Step 6: Adjust Camera Settings
Now that the video feed is live, optimize your system.
Camera Positioning:
- Adjust field of view.
- Use the monitor to fine-tune angles.
- Enable WDR (Wide Dynamic Range) for areas with shadows or backlight.
Resolution and Recording:
- Set the resolution (1080p, 4MP, 8MP, etc.).
- Define recording schedules (24/7, motion-based, or timed).
- Allocate storage based on motion detection to save space.
Step 7: Remote Access and Mobile App
Hikvision’s mobile app Hik-Connect allows you to monitor your system from anywhere.
How to Set It Up:
- Download the Hik-Connect app on your Android or iOS device.
- Register or sign in with a Hik-Connect account.
- On the NVR/DVR, go to Configuration > Network > Platform Access.
- Enable Platform Access and scan the QR code with the mobile app.
- Add the device and start live view.
Step 8: Maintenance and Troubleshooting
A well-installed CCTV system needs regular maintenance.
Maintenance Tips:
- Clean camera lenses every 1-2 months.
- Check for firmware updates in Configuration > Maintenance.
- Monitor hard drive health.
- Ensure cables remain intact and undamaged.
Common Issues and Fixes:
- No Video Feed? Check power supply and cable connections.
- Can’t Access Remotely? Check router port forwarding and Hik-Connect status.
- Camera Not Detected? Reset the camera or reassign IP addresses.
Why Choose techservice.ae for Hikvision Installation?
If you're looking for expert help, our professional team at techservice.ae is ready to assist. We specialize in the installation, configuration, and maintenance of Hikvision CCTV systems for homes, offices, smart infrastructures, and commercial facilities across Dubai, UAE.
Our Services Include:
- Site assessment and camera placement design
- Structured cabling and PoE system setup
- NVR/DVR and remote access configuration
- Integration with smart home and IoT systems
- Ongoing support and system health monitoring
With years of experience in advanced surveillance, you can trust techservice.ae to deliver a secure, efficient, and future-proof installation tailored to your unique needs.
Final Thoughts
To install a Hikvision CCTV system, you don’t need to be a tech expert — just follow these structured steps. From planning your layout to configuring remote access, each stage builds toward a secure and smart surveillance solution.
Whether for your home or business, installing a Hikvision CCTV system provides peace of mind and modern protection. For more advanced setups involving AI analytics, alarms, or integration with other smart systems, consider consulting a certified Hikvision installer — or contact us at techservice.ae for a consultation.
Stay safe, and enjoy the confidence of a well-installed security system.